Use a medium-fine grind: finer than you would use for pour-over, noticeably coarser than espresso, and close to the texture of table salt. In micron terms that is roughly 360 to 660, and most people settle between about 450 and 570. I have not brewed on every pot and grinder mentioned here. Everything below comes from published specs, owner reports and the named sources, and I attribute each figure to the page it came from.
TL;DR
- Aim for medium-fine, about the texture of table salt. Gritty between your fingers, never powdery.
- Start slightly coarse and move finer one step at a time. A grind that is too fine can clog the filter.
- Smaller pots (1 to 3 cup) tolerate a slightly finer grind. Larger pots (6 to 9 cup) want a touch coarser.
- Never tamp. Fill the basket level and leave the grounds loose.
- A burr grinder with small, repeatable steps matters more than any single number, because every grinder’s scale is different.
The short answer: medium-fine, not espresso
A moka pot pushes water through coffee with steam pressure, and that pressure is low. Online Coffee Guide describes the moka grind as medium-fine and usually coarser than espresso, with a grind that allows steady upward flow without blocking the basket. The reasoning is simple: if the grounds are packed too tightly by fineness, the water cannot get through at the pot’s modest pressure.
The most useful way to picture it is by feel. According to Honest Coffee Guide, Bialetti recommends medium-fine grounds that feel gritty but not powdery between your fingers. If you rub a pinch and it clumps into flour, it is too fine. If the particles look like coarse sand and roll freely, you have drifted toward drip territory.
Moka grind next to other methods
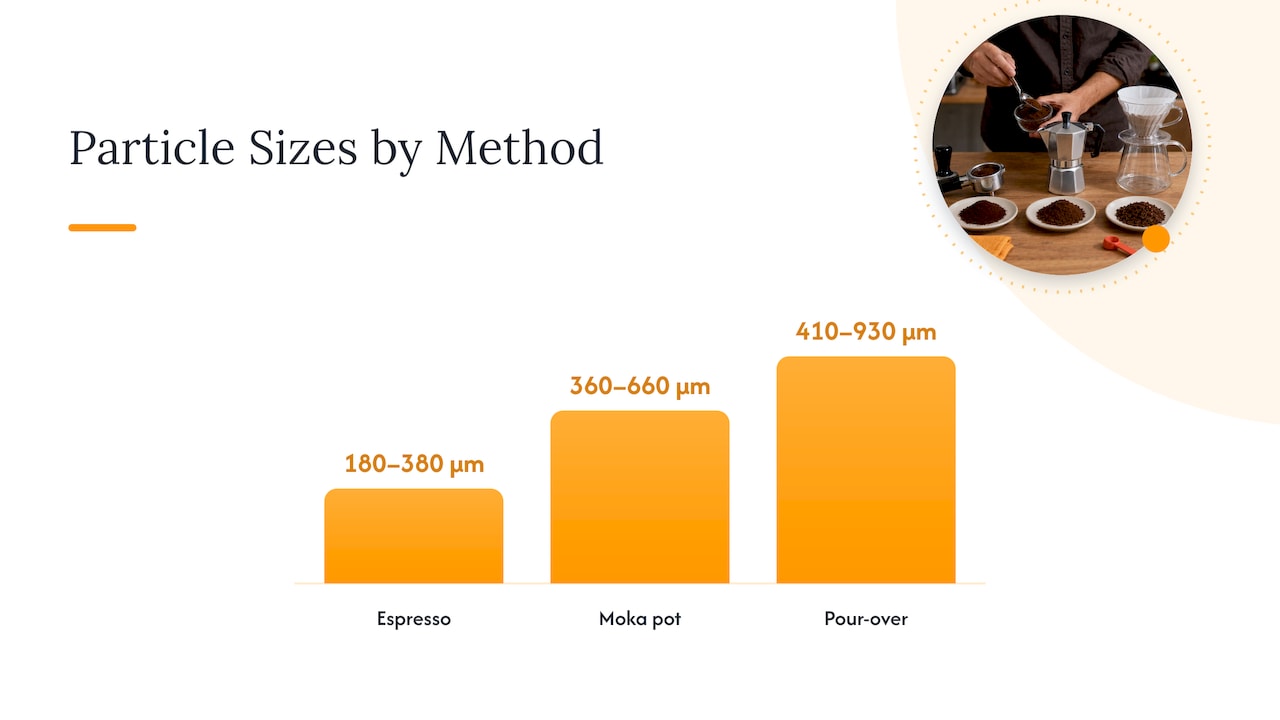
The same page lists approximate particle sizes for each method, which makes the gap easy to see:
| Method | Approximate particle size | Texture cue |
|---|---|---|
| Espresso | 180 to 380 microns | Fine, powdery |
| Moka pot | 360 to 660 microns | Table salt, gritty |
| Pour-over | 410 to 930 microns | Coarser, sandy |
Source for all three ranges: Honest Coffee Guide. Notice the overlap. The fine end of a moka pot sits right at the coarse end of espresso, and the coarse end of moka reaches into fine pour-over. That overlap is why your grinder’s own numbers matter more than a universal setting.
If you want to understand how the pot itself differs from a pump machine, I cover pressure, strength and upkeep in moka pot vs espresso.
Why espresso grind fails in a moka pot
It is tempting to use the same setting you use for an espresso machine. Don’t. Espresso Insiders says an espresso grind in a moka pot can clog the filter, cause pressure buildup and produce a bitter, over-extracted brew. Treat that as a safety point as much as a flavor one: a blocked basket means steam has nowhere to go.
CoffeeMaster.app explains the logic this way: a moka pot pushes water with far less force than an espresso machine. An espresso grind chokes it and gives a burnt, bitter cup, while a filter grind lets water rush through without extracting much, so the cup comes out thin and watery.
The same logic explains tamping. An espresso machine needs a tamped puck to create resistance against about 9 bars of pump pressure. A moka pot works with only 1 to 2 bars, so any compression restricts flow and spikes pressure. JavaPresse also advises against tamping because it can create too much pressure. Fill the basket level, wipe off the excess with a finger, and stop there.
Starting points by pot size
Pot capacity changes the coffee bed, and the bed changes how fast water passes through.
- 1 to 3 cup pots: The bed is shallow, so water moves through faster. Adira Coffee says a slightly finer grind compensates for that shorter contact time.
- 6 to 9 cup pots: More coffee mass and a deeper bed. The same source says a touch coarser prevents over-restriction and keeps flow steady.
- Medium pots (4 to 5 cup): Start in the middle of the range and adjust from the first cup.
The size of the adjustment is small. We are talking one or two steps on a stepped grinder, not a jump from “fine” to “coarse.”
How much coffee goes in
The basket sets the dose, so you do not weigh to a ratio the way you would for pour-over. As a reference point, Bialetti’s brew guide is commonly cited at about 20 to 22 g for a 6-cup pot, but your own pot’s basket volume is the real limit. Level, loose and full is the rule. If you change pots, expect to change grind slightly as well.
Adjusting for roast and coffee type
Grind is not only about the pot. Roast level changes how readily coffee gives up its flavor. CoffeeMaster.app puts the moka window at 450 to 570 microns and gives starting points by processing method: 480 microns for washed coffees, 510 for honey or wet-hulled, and 540 for naturals or anaerobic lots. Its roast adjustments are: light roasts stay at the starting point, medium roasts add 30 microns, and dark roasts add 60 microns.
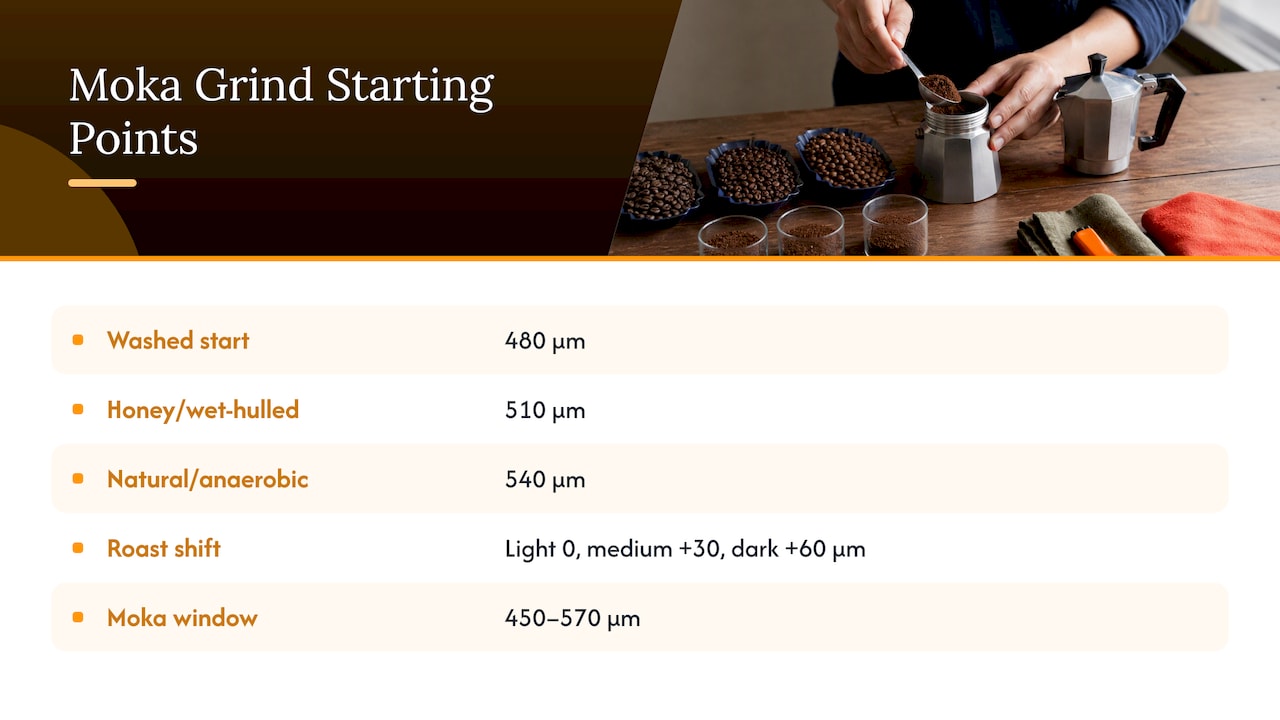
That is one aggregator’s model, not a standard, so treat it as a sensible direction rather than a rule. The pattern is consistent with common experience, though. Darker, more soluble beans extract easily and usually taste better a little coarser, while dense light roasts can stand more extraction.
How to dial in your grind, step by step
Because every grinder’s scale is different, the reliable method is to calibrate against your own cup.
- Start slightly coarse. Luke Barham of Espresso Insiders says it is safer and more effective to begin a little too coarse and dial finer, rather than start too fine and risk a clogged filter.
- Fill the basket level, no tamping. Use fresh grounds, ground just before brewing.
- Heat gently. Lower heat is easier on the coffee and on the pot.
- Remove the pot as the stream turns pale and sputters. Leaving it on the heat after that point adds harshness.
- Taste, then change one thing. One step on the grinder, or one change in heat, never both together.
- Write the setting down. Pair it with the bean and roast date so you can return to it.
One published reference point: a guide in the Google results sets a burr grinder to about 14 to 16 on a 1 to 30 scale and says to go finer or coarser one click at a time. That scale belongs to one specific grinder, so do not carry it over to yours. Use it only as a reminder that the right setting sits in the middle of a scale, not at the fine end.
Fixing bitter or sour moka coffee
Most moka complaints trace back to grind, heat or timing. Here is how the sources line up.
| Symptom | Likely cause | First fix |
|---|---|---|
| Bitter, harsh, ashy | Over-extraction: grind too fine, heat too high, pot left on too long | Grind one step coarser, lower the heat, pull the pot earlier |
| Sour, thin, weak | Under-extraction: grind too coarse, basket underfilled, heat too low | Grind one step finer, fill the basket level, nudge heat up |
| Pot gurgles hard or spits early | Flow restricted or heat too high | Coarser grind, lower heat, check for tamping |
The bitter-coffee fixes (coarser grind, shorter brew, lower heat) come from JavaPresse. For sour coffee, Talk About Coffee recommends grinding finer, filling the basket level, or increasing heat. Adira Coffee gives a matching one-click rule: for bitter coffee go one click coarser and remove the pot before the gurgling sputter, and for sour or weak coffee go one click finer after confirming the dose.
Trade Coffee describes the extremes similarly in its moka guide: too fine traps water and gives a bitter, ashy, sharp cup, while too coarse lets water rush through and gives a watery, sour one.
Pre-ground coffee: will it work?
Yes, if it is labeled for moka pot or stovetop use, or described as medium-fine. Bags marked “espresso” are usually too fine for this pot, which is the same problem described above. Bags marked “drip” or “filter” are usually too coarse. Pre-ground coffee also stales faster than whole beans, so the freshest result still comes from grinding at home. I have no way to say how any particular bag grinds, so check the label and adjust by taste.
Choosing a grinder for moka pot
The grinder matters because a moka pot sits in a narrow band. Small, even steps let you hit it.
- Burr, not blade. Burrs produce more uniform particles. Blade grinders produce dust and boulders together, and the dust is what clogs the filter.
- Fine adjustment. You want enough steps around the medium-fine zone to make one-click changes. Stepless or micro-stepped grinders suit this best.
- Range that covers espresso. A grinder built for espresso has finer control through the part of the scale a moka pot uses, which is why the grinders people shop for espresso also suit moka. I compare current options in my best espresso grinder for home use guide.
- Manual or electric. A hand grinder costs less and takes more effort. An electric one is faster for daily use. I weigh both in manual vs electric grinder.
If a grinder jams or stops feeding, that is a different problem from grind setting, and I lay out three separate causes in coffee grinder not grinding.
Choosing the pot itself
Grind advice only works if the pot is in good shape. When I compare moka pots, these are the criteria I use:
- Capacity. Cup sizes are small, closer to espresso servings than mugs. A 3-cup pot is a solo drink. Think in terms of how many small cups you pour.
- Material. Aluminum is the traditional choice. Stainless steel is more durable and lasts longer, which I rank in best stainless steel moka pot.
- Replaceable parts. The sources I read point to durability and the availability of replacement parts as the thing to check. Top Off My Coffee explains that steam pressure in the lower chamber forces water up through the funnel and grounds, and Brian Mounts notes that gasket life depends on technique: lower heat and prompt removal from the stove extend it.
- Usability. A comfortable handle, a clean pour and a spout that does not drip matter every morning.
My full ranking of five pots is in best stovetop espresso maker.
My perspective
Most moka pot advice stops at “medium-fine.” That is correct and not very helpful, because medium-fine on one grinder is a different setting on another. I would rather give you a method than a number: start a little coarse, change one step at a time, and let the cup tell you.
What I look for when I compare grinders is how small and repeatable the adjustment steps are around the moka range, because that is where a bad grinder shows up. I read owner reviews for complaints about inconsistent steps and drifting settings, and I report the strengths and the complaints side by side.
I do not brew on any of these products myself. What I offer is a careful read of specifications, pricing and what owners report after months of use, so you can narrow the options before you spend money.
Glenn
Where to go next
If you are still choosing equipment, my coffee equipment reviews and guides put pots and grinders side by side with specifications, pricing and owner-reported complaints, so you can compare before you click through to a retailer. Start there, or browse the full site at Kitchenware Compare.

If you also use filter methods, French press vs pour-over explains how grind shifts between them.
FAQ
What grind size is best for a moka pot?
Medium-fine, about the texture of table salt. That is finer than pour-over and coarser than espresso, and roughly 360 to 660 microns according to Honest Coffee Guide. Start on the coarse side and move finer in small steps.
What happens if you grind too fine for a moka pot?
The grounds can block the filter, water gets stuck, and the coffee tastes bitter and over-extracted. Espresso Insiders also warns that an espresso grind can cause dangerous pressure buildup. If the brew drags on or the pot sputters hard, move one step coarser.
Can I use an espresso grind in a moka pot?
No. Espresso is built for about 9 bars of pump pressure, while a moka pot works with only 1 to 2 bars, according to the sources above. Use a medium-fine setting instead, and never tamp the grounds.
Do I need a different grind for a bigger pot?
Slightly. Adira Coffee says smaller 1 to 3 cup pots benefit from a slightly finer grind, and 6 to 9 cup pots from a touch coarser one. Treat that as a starting adjustment, then fine-tune by taste.
Should the grind change with roast level?
Usually a little. CoffeeMaster.app suggests keeping light roasts at the baseline, adding about 30 microns for medium roasts and about 60 for dark roasts. Use it as a direction, then taste and adjust.
Sources
- Coffee Grind Size Chart, Honest Coffee Guide
- Coffee Grind Size Chart: Settings by Brew Method, Online Coffee Guide
- Moka Pot Grind Size: Settings for 13 Grinders, CoffeeMaster.app
- The Best Grind Size For Moka Pot Revealed, Espresso Insiders
- The Right Moka Pot Grind Size: A Practical Dial-In Guide, Adira Coffee
- The Ultimate Guide to Brewing Moka Pot Coffee, JavaPresse
- How to Make Coffee with a Stovetop Moka Pot, Talk About Coffee
- Step-by-step guide to brewing moka pot coffee, Trade Coffee
- How Does A Stovetop Espresso Maker Work, Top Off My Coffee
Recommended
- Moka Pot vs Espresso: Pressure, Strength, Cost and Upkeep
- Manual vs Electric Grinder: Which Should You Buy?
- Best Stovetop Espresso Maker 2026: 5 Moka Pots Ranked
- Coffee Grinder Types: Blade, Burr, Manual and Electric

I'm Glenn, and I started Kitchenware Compare to cut through conflicting product reviews and help readers pick kitchen gear with confidence. I don't own or test the products I write about — these guides are built from verified-purchase reviews, manufacturer specifications, and independent testing where it exists, with the reasoning shown, not just a rating.
Leave a Reply